
Quickbooks is the real ideal for bookkeeping. This is especially true for small and medium-sized enterprises. As a Quickbooks consumer, the errors that occur from time to time can be daunting. Quickbooks missing name list problem is an example of a disastrous mistake. Worrying about it is an old story now. This is due to the fact that we have produced a concise guide for you. This post contains what you need to know about this error.
Everything you have to do is carefully observe each step one by one. You must try each approach before you find the right and complete answer. So, without further ado, let us get right into it.
What is Quickbooks Missing Name List Problem ?
The missing name list problem QuickBooks is an issue that you can face while trying to open a Quickbooks company file. It is essentially an error that occurs in Quickbooks desktop as a result of a number of missed data and directories.
Solutions for Quickbooks Error Missing Name List Problem
If you encounter a challenge when using the QuickBooks app, thoroughly read through all of the remedies.
Solution 1: Use QuickBooks File Doctor
The Quickbooks file doctor is a fantastic method that will fix the majority of corporate file-related issues. QB file doctor is a tool in the Quickbooks Tool Hub information framework. Here’s how you’ll make use of this great app.
- First and foremost, download and install the Quickbooks tool hub app..
- Now, open the tool hub.
- Navigate to the segment for business file issues.
- Here, you must select the Run Quickbooks File Doctor option.
- Examine the business file that was causing you problems. Select Patch from the drop-down menu.
- The file doctor will detect and fix the problem automatically. You will be alerted about it.
Solution 2: Conduct QuickBooks Clean Install
The clean instal tool aids in the removal of infected and damaged Quickbooks files. To resolve this problem, simply reinstall the Quickbooks software kit. Here’s how you should go about doing that.
- If you do not already have Quickbooks Tool Hub, download it and then open it.
- Navigate to Installation issues now.
- Then, choose the Clean instal tool option.
- The clean instal method will be started.
Solution 3: Make Use of Auto Data Recovery
To restore all recent transactions, use the original dealing Log file and the ADR version of the business file.
Remember this when attempting Auto Data Recovery.
Quickbooks Auto Data Recovery is only available in the Technical, Premier, and Enterprise editions of Quickbooks.
- The data recovery feature is not included in the controller versions.
- The maximum file size is just 1.5 GB.
- You can use the most recent edition of Quickbooks.
Let us now look at how to restore QuickBooks Auto Data Recovery.
How to Make File Extensions Visible
If you can’t find the.tlg register, you can try this to mean file extensions.
- To begin, press Windows+E on your keyboard to open the File human.
- Now, pick the Organize option, followed by the Folder and Search options.
- For Windows 10, 8.1, and 8, pick read, followed by file name extension.
- Then choose Hide extensions for well-known file types.
- Simply click Apply and then OK.
- Locate the QuickBooksAutoDataRecovery folder and double-click it. It’s in the same place as your business register.
- Copy and paste the.QBW.adr file into the QBTest folder. You must also have a.QBW.adr and.tlg file in your QBTest archive. Right-click the.QBW.adr file in your QBTest folder and choose Rename.
- Delete the.adr extension at the top of the file.
- Launch QuickBooks.
- Open the business file located in your QBTest folder. Use the account registry to ensure that all transactions are recorded there.
- Select File, then Utilities, and finally Examine the knowledge credibility of the retrieved file by verifying facts.
- If this copy of the corporate file is satisfactory, you will be able to relocate the broken business file to a new location and migrate the copy from QBTest to the original location.
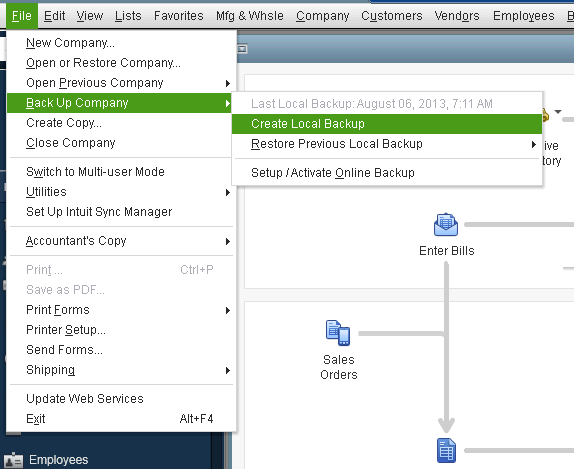
Solution 4: Restore a previous version’s backup
Here’s how to go about it.
- First and foremost, you must press on the business file.
- Now, choose Open or Restore Company from the menu.
- Following that, you must choose Restore a backup copy. Later, press the Next button.
- You must ensure that you have selected Local Backup. After that, you can proceed by selecting the Next alternative.
- Finally, press Save to finish the operation.
ALSO VISIT: QuickBooks Online Error 9999
Conclusion
Those were the fixes for this bug. We hope that using our tools, you were able to eliminate this mistake. Check out the other posts on our website; they would be of great assistance to you.
Leave a Reply